AI Studio
AI Studio is the authoring workspace for AI-generated automation. You describe what to test, an AI agent drives the application to work out how, and the result becomes an executable scenario.
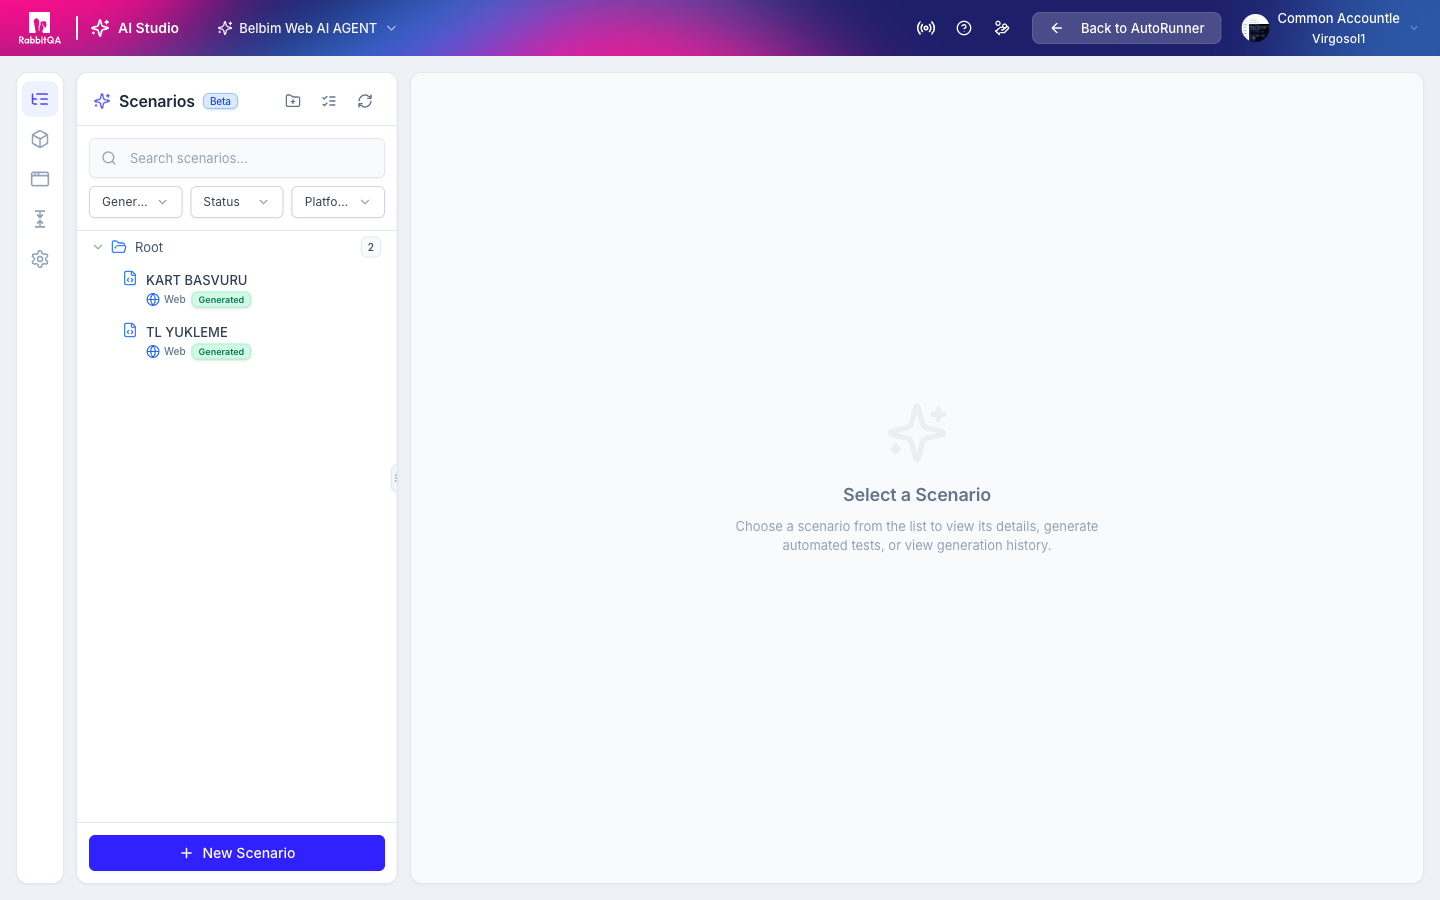
Open it from AI Studio in the header of Scenarios or Test Plans. The first time you do, the workspace's AI source is provisioned automatically.
AI Studio replaces the normal shell chrome with its own header, which carries a source switcher and a Back to AutoRunner button.
AI Studio is in beta. Features and behavior may change.
Tabs
A narrow icon rail on the left switches between these areas.
| Tab | Purpose |
|---|---|
| Scenarios | The scenario tree and the scenario detail panel |
| Test Files | Test data files. Shown only for mobile sources. |
| Element Repository | The registry of screens and elements |
| Screens | Screen knowledge, screenshots, and application flows |
| Custom Steps | Reusable composite steps |
| Settings | Generation defaults for this source |
The Scenarios icon shows a pulsing badge with the number of active generation runs.
Element Repository and Screens are documented in Element Registry.
Scenario Tree
The left panel of the Scenarios tab is the scenario tree.
- Search scenarios filters as you type.
- New Folder, Select All / Deselect All, and Refresh sit in the tree header.
- New Scenario is at the bottom.
Filters
Three multi-select dropdowns, each with a Clear all entry. Active values appear as removable chips.
| Filter | Options |
|---|---|
| Generated | Generated, Not generated |
| Status | Generating, Pending, Pass, Fail, Error, Aborted |
| Platform | Web, Android, iOS, Desktop |
A generation in progress shows as Generating rather than "Running", which is reserved for test runs.
Bulk Actions
Checking scenarios reveals a bar with Generate, Move, and Delete. Scenarios already generating are excluded, and the bar explains that you need to deselect them first.
Row Menus
Folders offer New Subfolder, Rename, Move to..., Duplicate, and Delete. Scenarios offer Rename, Duplicate, Move to..., Copy Link, and Delete.
Creating a Scenario
New Scenario offers two paths:
- Import from Test Repository — bring in existing test cases.
- New Scenario — write one from scratch.
The scenario form has:
| Field | Notes |
|---|---|
| Scenario Name | Required |
| Folder | Optional; you can create a folder inline |
| Pre-Conditions | What must already be true before the scenario runs — a logged-in user, seeded data, a specific page |
Then choose how you describe the test:
- AI Prompt — describe the test in natural language. Type
$to insert a variable. - Step by Step — enter each step's action and expected result, reordering by drag.
Finish with Create Scenario, or Create & Generate to start generation immediately.
Generating Automation
Generate in the detail panel header starts a generation run. Once steps exist, the button becomes Re-Generate. Stop ends a running generation.
Save any pending edits first — generation is blocked while there are unsaved changes.
Choosing a Target
The generate dialog first asks for a platform:
| Option | For |
|---|---|
| Web | Browser-based tests |
| Android | An app or a browser on an Android device |
| iOS | An app or a browser on an iOS device |
| Quick Run | Uses your saved defaults. Disabled until you configure them under Settings. |
When the scenario already has generated steps, Generate into a new scenario copies it first so the current scenario keeps its steps.
Web
Maintain a list of Target URLs and pick which one is the default. The default is used when a scenario has no start URL of its own.
Mobile
Choose the Test type:
- Native App — install or launch an app on the device.
- Mobile Browser — open the scenario in a browser on the device.
Then choose the device. Auto-assign lets the system pick an available device, or Select specific device opens the device list with a search box, a Device Type filter (Real Device or Emulator), and a version filter. Devices show as Online, Available, Busy, or Offline. Choosing a busy device turns the action into Queue Run — the run queues and starts when the device frees up.
For a native app, pick the application from one of four sources:
| Source | Content |
|---|---|
| Installed | Apps already on the device |
| Distribution | Firebase App Distribution releases |
| Files | Previously uploaded builds |
| Upload | A new APK, IPA, or AAB |
See Devicer for the device farm itself.
Regenerating from a Step
Any step's menu offers Regenerate from here.
Steps before the chosen one are replayed deterministically in one session, then generation replaces that step and everything after it. You can review or edit the generation prompt first, and tick Create a new scenario to write the result into a copy instead of overwriting.
Regenerating from a step inside an IF, FOR, or WHILE block affects the whole block.
Resuming a Generation
A generation run that stopped part-way shows a Resume action in the History tab, which continues from the stored checkpoint rather than starting over.
Scenario Detail Panel
The right panel has seven tabs.
| Tab | Content |
|---|---|
| Scenario | Pre-conditions and either the AI prompt or the manual steps |
| Script | The generated automation steps and their editor |
| Live | The live view of a running generation. Enabled only while a run is live. |
| Variables | Scenario variables |
| Versions | Automation versions and activation history |
| History | Generation runs for this scenario |
| Files | Test data files for this scenario |
The header also carries Link to TestPilot, Share Link, Stop, and the generate button.
Script
The Script tab holds the executable steps.
Toolbar actions: View Generation, Search (Ctrl+Shift+F), Timeline, Variables, and Edit / Save.
Timeline opens an animated walkthrough of the run's screens, with play, pause, step navigation, and 1x to 8x speed.
In edit mode you can:
- Select steps from the left gutter and Wrap Selected Steps in an
IF,WHILE, orFORblock, then set the condition. - Use the step bulk bar for Update Settings, Wrap in Block, Copy, Create Custom Step, and Delete.
- Use a step's menu for Insert step below / above, Move up / down, Duplicate, Copy step text, Run only if a condition…, Settings, and Delete.
Elements referenced by a step are picked from the Element Registry, which is what makes a generated scenario survive UI changes.
Versions
Automation is versioned. Each version is one of:
| State | Meaning |
|---|---|
| Active | Runs use this version. Editing it creates a draft first. |
| Review draft | Saved but not active. Review it, edit if needed, then publish explicitly. |
| History | Read-only. You can preview it or make it active again without creating a new version. |
Actions include Edit draft, Save draft, Publish, Discard, Preview, Make active, and Delete version, plus bulk delete of selected versions. Publishing validates and compiles the draft; future runs use it only once both succeed.
Rows carry warnings where they apply — the document schema version, steps that will not run, steps that need review, and validation issues.
Below the version list, Activation history records publish, restore, deactivation, and import events separately from the versions themselves.
History
Every generation run for the scenario, with its status and result, plus Resume where the run can be continued and View Agent Conversation for a read-only replay of what the agent did.
Working with a Running Agent
While a generation is live, the Live tab streams the browser or device.
An activity bar over the viewer names what the agent is doing — Starting, Understanding, Planning, Acting, Reviewing, Thinking, Paused, Waiting for you, Finished — with a button that opens the agent panel.
Conversation
The RabbitQA Agent panel shows plans, actions, blockers, and your guidance as one timeline. Messages are labelled You, System, or Agent.
When the agent needs input, it posts a Waiting for your answer card and the panel shows a Needs answer pill. Type your answer and send it to unblock the run.
Pause and Resume
A single Pause / Resume button controls the agent, with PAUSED and WAITING FOR INPUT status badges. While paused you can queue a message for when the run resumes.
Pause is disabled while a question is pending — answer it first.
To end the run entirely, use Stop.
Custom Steps
A custom step is a named BDD pattern with typed parameters that expands into an ordered list of existing steps — a reusable login flow, for example.
| Field | Notes |
|---|---|
| Step Key | Lowercase snake_case, no spaces. Fixed after creation. |
| Platform | Android, iOS, Web, or Desktop |
| BDD Pattern | Use <param> placeholders, for example Login with "<username>" and "<password>" |
| Folder | Defaults to Unfiled |
| Parameters | Derived automatically from the placeholders in the pattern; set each one's type and display options |
| Child steps | The steps the custom step expands to, reorderable by drag |
Child steps bind their elements by qualified name — Screen.element — drawing on the active registry elements across every platform.
You can also create a custom step from a selection in the Script tab with Create Custom Step.
Settings
Generation defaults for this source, in four sub-tabs.
AI Config
Assertion Level controls how many verification checks the AI generates:
| Level | Behavior |
|---|---|
| None | No assertions — actions only |
| Minimal | Only critical checks, such as page loads and form submits |
| Moderate | Balanced — UI elements and data validation. The default. |
| Comprehensive | Detailed checks on every step |
AI Generation Instructions holds project-level rules applied to every web and mobile generation — for example, that a cookie popup is optional, that payment confirmation steps must never be skipped, or which test account to use for login.
Scenario Steps
- Setup Steps (Before) run before each scenario starts, such as logging in or navigating to a starting page.
- Cleanup Steps (After) run after each scenario ends, such as logging out or clearing data.
Both lists are reorderable by drag.
Web
Web Defaults for AI web runs:
- Saved URLs — the entry points, with one marked default. The default is used when a scenario has no start URL.
- Proxy — a proxy server and a bypass list.
- Chrome Hub tags — route web runs to matching Chrome Hub nodes. Tags are lowercased and de-duplicated.
Mobile
Mobile Defaults for mobile generation: a Default Platform, a Default Device (auto-assign or a specific device), and a Default App. These are what Quick Run uses in the generate dialog.
Linking to CaseWriter
Link to TestPilot in the detail panel header creates a test case from the scenario and keeps it in sync.
Pick a Test set and a Priority, then Create & Link. Later edits to the scenario's name, description, steps, expected results, and preconditions sync to that case automatically.
Once linked, the control becomes a CaseWriter badge that opens the linked case in CaseWriter's test repository in a new tab.
Linking reads test sets and priorities from the test management module. If you do not have access to it, the dialog cannot load its options.
Next Steps
- Element Registry — Screens, elements, locators, and the proposal queue
- Test Plans — Put generated scenarios into a runnable plan
- Run Detail — Analyze what the generated scenario did
- AI Editor — The code editor for repository-backed sources
