Issue Tracker
The Issue Tracker is the single place to see every issue raised from your test executions, whether it lives in RabbitQA or in an external tracker.
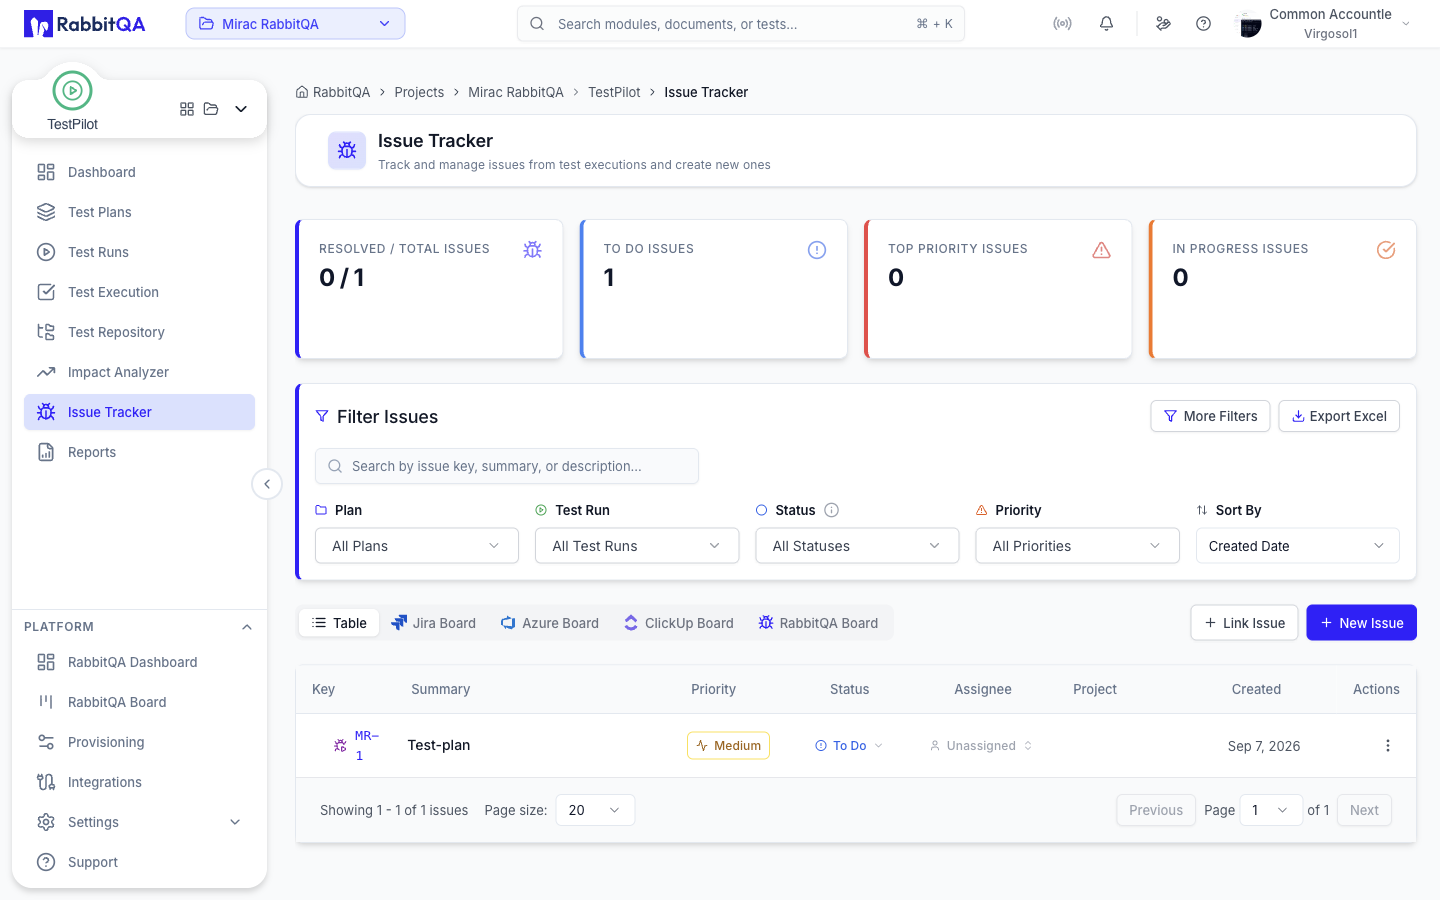 Open TestPilot > Issue Tracker.
The list refreshes on its own every few seconds, so status changes made elsewhere appear without a reload.
Open TestPilot > Issue Tracker.
The list refreshes on its own every few seconds, so status changes made elsewhere appear without a reload.
Summary cards
Four cards sit above the tabs and follow whichever tab you are on:
| Card | Value |
|---|---|
| Resolved / Total Issues | Resolved count against the total |
| To Do Issues | Issues not yet started |
| Top Priority Issues | Critical and high priority issues |
| In Progress Issues | Total minus To Do and Resolved |
Tabs
| Tab | Shown |
|---|---|
| Table | Always |
| Jira Board | Always |
| Azure Board | When Azure DevOps is enabled for your organization |
| ClickUp Board | When a ClickUp connection is configured |
| RabbitQA Board | Always |
Table
Filtering
The filter panel is headed Filter Issues.
| Filter | Type |
|---|---|
| Search | Free text over issue key, summary, and description |
| Plan | Multi-select over your test plans |
| Test Run | Multi-select, scoped to the selected plan |
| Status | Multi-select over the statuses in use |
| Priority | Multi-select over the priorities in use |
| Sort By | Created Date, Updated Date, Priority, or Status |
Results are sorted newest or highest first; there is no ascending toggle, and the table headers are not sortable.
Status filtering behaves differently per tracker. Jira and Azure issues are filtered by status category, while RabbitQA issues are filtered by their exact status.
More Filters opens an Advanced Filters dialog with:
- Labels - multi-select
- Assignee - single select over users and groups
- Date Range - From and To dates
Active filters appear as removable chips, with a Clear All action. Export Excel downloads the current, filtered list as a spreadsheet.
Filters reset to their defaults when you come back to the page.
Columns
| Column | Contents |
|---|---|
| Key | Tracker icon and issue key; expandable when the issue has linked tests |
| Summary | Issue summary, a Linked badge, and the test result ID when present |
| Priority | Priority badge |
| Status | Editable inline |
| Assignee | Editable inline |
| Project | Test plan and test run the issue came from |
| Created | Creation date |
| Actions | Row menu |
Click a row to open the issue detail panel. Expand the Key cell to see a Linked Tests sub-table with the project, test run, and test case title; clicking a row there jumps to that test execution.
Row actions
- Edit Issue
- Open in Jira / Open in Azure - opens the issue in the external tracker
- Test Case Generation - hands the issue to CaseWriter's AI generator
- Copy URL - copies a link that reopens this issue
- Delete Issue
Deleting a non-RabbitQA issue offers an Also delete from Jira checkbox. Leave it clear to unlink the issue from RabbitQA while keeping it in the external tracker.
The table is paged, with a page size of 10, 20, 50, or 100.
Boards
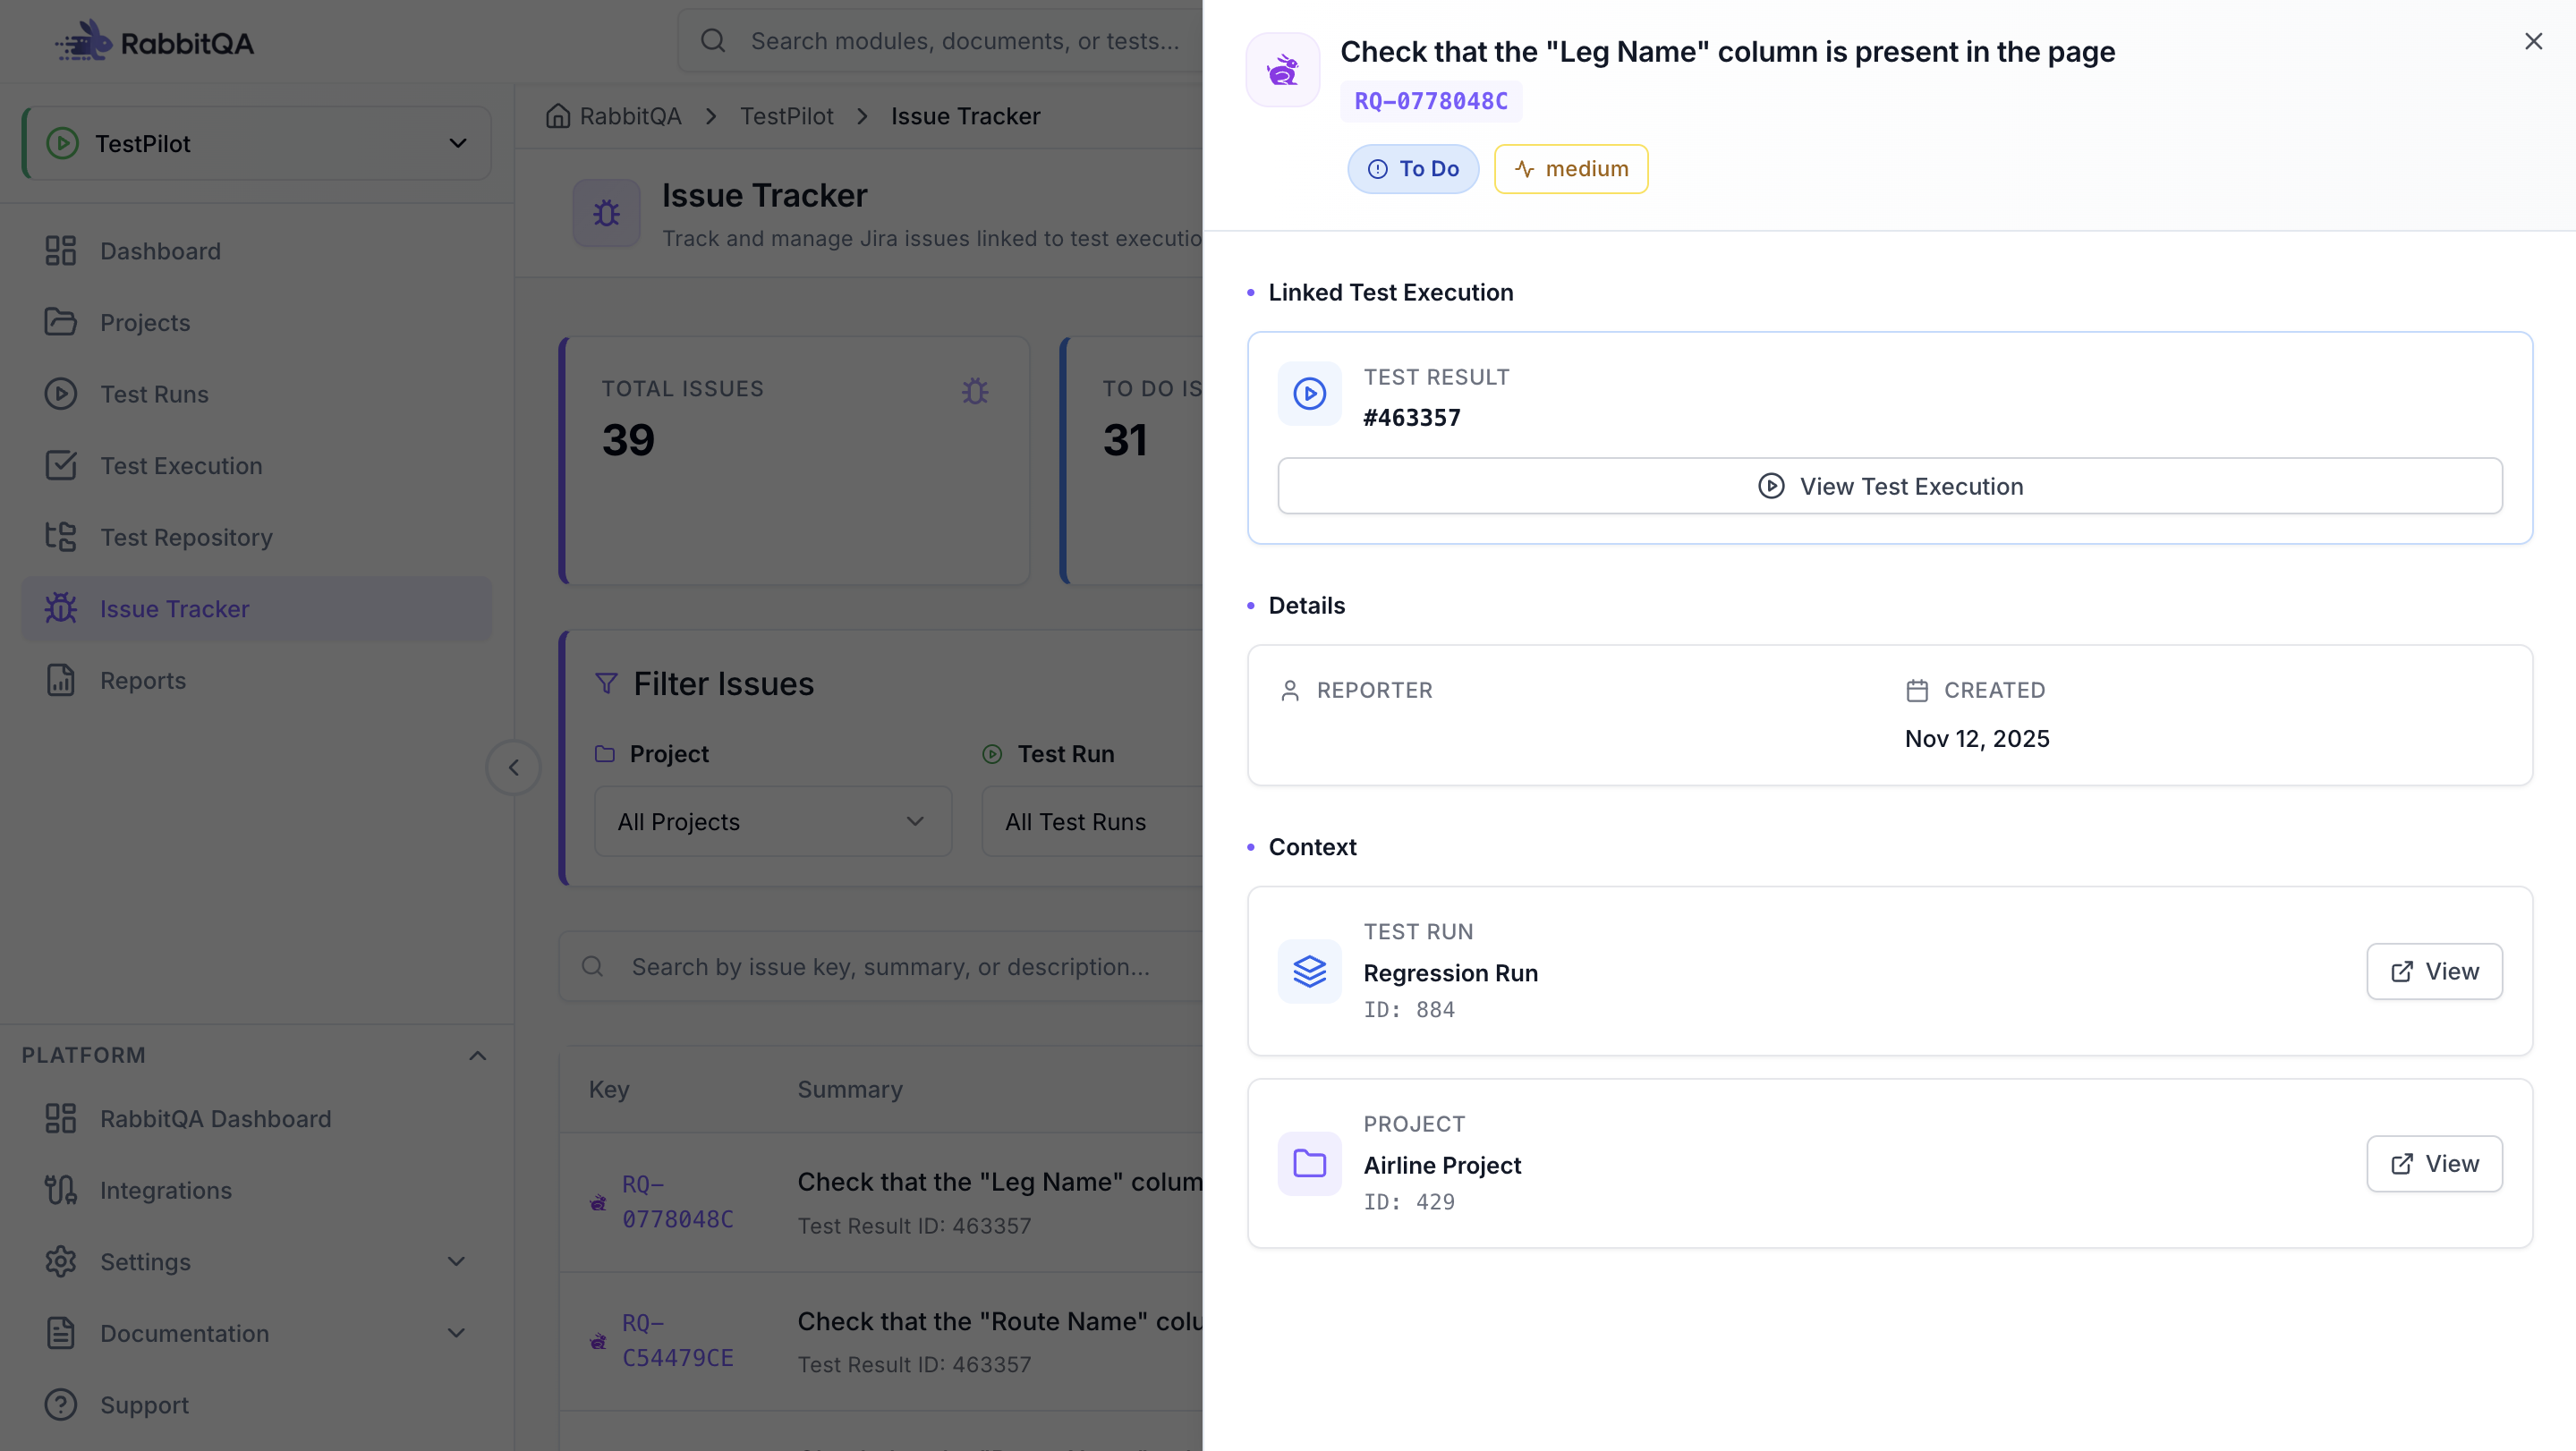
Every board tab works the same way: one column per status, with issues grouped into their current status.
The Jira and Azure boards have a project selector; the ClickUp board has a list selector. The RabbitQA board shows all internal issues. Each board header shows a Total Issues count.
Drag and drop
Drag a card into another column to change its status. This requires the issue update permission.
While you drag, columns that the issue cannot move to are dimmed and marked Not available, and valid targets show a Drop here outline. Dropping on an unavailable column is refused with a message naming the status.
Each card shows the tracker icon and key, the summary, the plan and run it came from, a priority icon, an attachment count, the created date, and an assignee avatar you can change in place.
Issue detail
Selecting an issue opens a side panel.
The header carries the issue key, Edit, Remove Issue, Test Case Generation, and - for external issues - Open in Jira or Open in Azure. For a RabbitQA issue it also offers Send to Jira and Send to Azure.
Below that:
- Project, Status, and Priority
- Description - Azure descriptions render as formatted HTML
- Linked Tests - the executions this issue is attached to, with links through to them
- Issue Management - change the status inline, and see the reporter
- Test Case - the number of generated cases, with a link to the generation session
- Details - assignee, created, and updated
- Labels - editable inline if you hold the update permission
Status and labels can be edited directly in the panel. The assignee is changed from the table row or a board card. Summary, description, and priority are changed through Edit.
Panel tabs
| Tab | Contents |
|---|---|
| Comments | Threaded comments with their own attachments; add, edit your own, and delete |
| Attachments | Files on the issue, with preview, download, and delete |
| History | Field-by-field change log with the old and new value, actor, and timestamp |
| Device Info | Device context, shown only when the issue was raised from a device session |
Comment and attachment uploads accept up to 10 files at a time, 10 MB each. Read-only users can still download attachments; the delete control is hidden.
Device Info and cross-device verification
When an issue carries device context, a Device Info tab appears with the device model, platform and OS version, real device or emulator, browser, app version, network, locale, and device ID, plus any additional metadata and the source module. If the issue came from a recorded session, View Session opens that session.
The same tab holds a Verifications card, which records whether the bug reproduces elsewhere.
Choose Verify on Other Devices and record a device name, platform, a result of Reproduced, Not Reproduced, or Partial, and optional notes.
Each entry is attached to the issue, and the card summarizes them as Reproduced on n of m devices.
Creating an issue
New Issue opens the RabbitQA issue form.
| Field | Notes |
|---|---|
| Test Plan | Required when the workspace has plans; preselected from your current filter |
| Summary | Required |
| Description | Plain text; pasting an image attaches it |
| Labels | Optional |
| Priority | Critical, High, Medium, or Low |
| Status | From the configured RabbitQA statuses |
| Attachments | Up to 10 files, 10 MB each |
From this form you can switch to Jira or Azure DevOps instead of saving internally. A confirmation dialog warns that the form's contents move across.
Jira
The Jira form asks for a Project and an Issue Type, then renders the fields that your Jira project actually defines, including required-field validation. When you arrive from the RabbitQA form, the summary, description, and priority are carried across and can be edited before saving.
Azure DevOps
The Azure form asks for a Project and a Work Item Type, then renders that work item type's fields. Rich text fields use a formatting editor with bold, italic, bullet lists, and numbered lists, and Azure descriptions are rendered back as formatted HTML in the issue detail panel.
Azure issue creation also carries over attachments that were already on the issue, alongside any new files you upload.
Linking an existing issue
Link Issue attaches an issue that already exists in Jira, Azure DevOps, or ClickUp. Pick the tracker, then the project or list, then search for the issue. The button is disabled when no tracker connection is configured.
Sending a RabbitQA issue to an external tracker
From an existing RabbitQA issue, Send to Jira or Send to Azure creates a matching issue in that tracker. The summary, description, priority, status, and the plan, run, and test result context travel with it. Sending to Azure also carries the issue's attachments.
The original RabbitQA issue is not deleted or converted; you end up with an issue in each system.
Permissions
Issue actions are gated on the cross-product integration keys, not on TestPilot's own keys, because the same issue endpoints are shared by several modules:
| Action | Permission key |
|---|---|
| Create or link an issue | integration:issue:create |
| Edit, change status, assign, comment, attach, label | integration:issue:update |
| Delete an issue | integration:issue:delete |
Reading issues is gated on integration:issue:read; holding any of the other integration:issue:* keys grants read as well.
Without the update permission, the status and assignee controls render as plain text rather than as dropdowns that do nothing.
Next steps
- Test Executions - raise issues from a failing test
- Reports - see a run's issues alongside its results
