AI Editor
The AI Editor is a full-screen code editor for a repository-backed source. Use it to edit spec files, concepts, and step implementations without leaving RabbitQA.
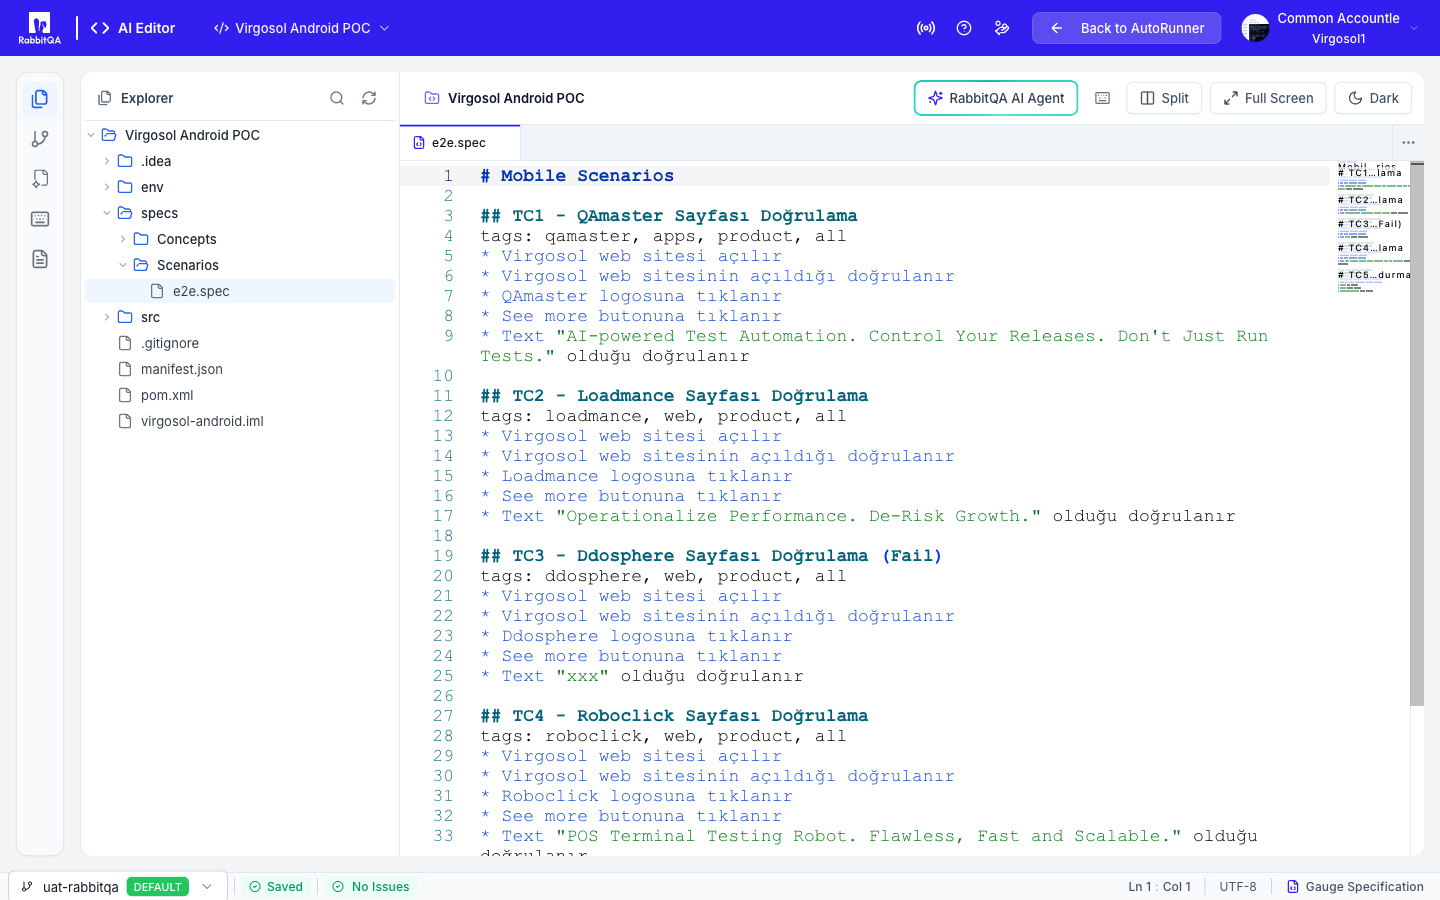
Open it from the AI Editor button in the header of Scenarios or Test Plans, or from a scenario's Edit action.
Layout
| Area | Content |
|---|---|
| Icon rail | Explorer, Source Control, AI Context, Keyboard Shortcuts, and a documentation link |
| File tree | The repository's files for the selected branch |
| Editor | Monaco, with a tab per open file |
| Status bar | Branch, save state, Gauge lint status, cursor position, encoding, and file type |
The header shows the source name, an unsaved-changes badge with a count while you have pending edits, and a Read-only badge when you do not have editor write permission.
Editing
- Open several files at once; each gets a tab.
- Split (
Ctrl+\) shows two panes side by side. Close Split returns to one. - Full Screen hides the surrounding chrome.
- A Light / Dark toggle switches the editor theme.
- Diff mode compares the file against its original content.
Gauge Support
The editor understands Gauge specifications:
- Syntax highlighting with dedicated light and dark themes.
- Step suggestions as you type.
- Go to definition, from a step in a spec to its implementation.
- Inline linting for spec problems.
Keyboard Shortcuts
The Keyboard Shortcuts button in the header opens a dialog listing the bindings: Search files, Go to line, Find, Replace, Undo, Redo, Commit, Toggle Split, Focus Left, and Focus Right.
Unsaved Changes
Leaving the editor with unsaved work prompts you to Stay or Leave. The same guard applies to browser navigation and to closing the tab.
Source Control
The Source Control panel in the icon rail shows pending changes with a count badge. The Branch Selector is at the left of the bottom status bar and switches the branch the file tree and tabs read from.
RabbitQA AI Agent
The RabbitQA AI Agent button opens an assistant that works against the file you have open.
Open a file first — the assistant needs a file for context.
The dialog offers Quick Actions that change with the file type:
| File type | Quick actions |
|---|---|
| Spec | Add Scenario, Improve, Add Steps, Debug Help, Explain |
| Concept | Add Concept, Improve, Explain |
| Java / Kotlin | Implement Step, Add Assertions, Refactor, Error Handling, Explain |
You can also type a request in your own words, reuse a prompt from the history list, or start from a template.
Reviewing a Suggestion
Generated code appears as an inline preview with three actions:
| Action | Shortcut |
|---|---|
| Accept | Ctrl+Enter |
| Reject | Esc |
| Regenerate | Ctrl+R |
Answer-style actions such as Explain open a response panel with an insert-into-editor action instead.
Resolve the current suggestion before asking for another.
The AI Agent is available only to users with editor write permission.
AI Context
The AI Context panel holds the project knowledge the assistant draws on when it generates code.
Next Steps
- AI Studio — Generate automation with an AI agent instead of writing it
- Element Registry — The screens and elements AI-generated scenarios bind to
- Sources — Connect the repository this editor opens
- Test Runs — Run what you edited
