Team Management
Manage your organization's users, roles, and access permissions.
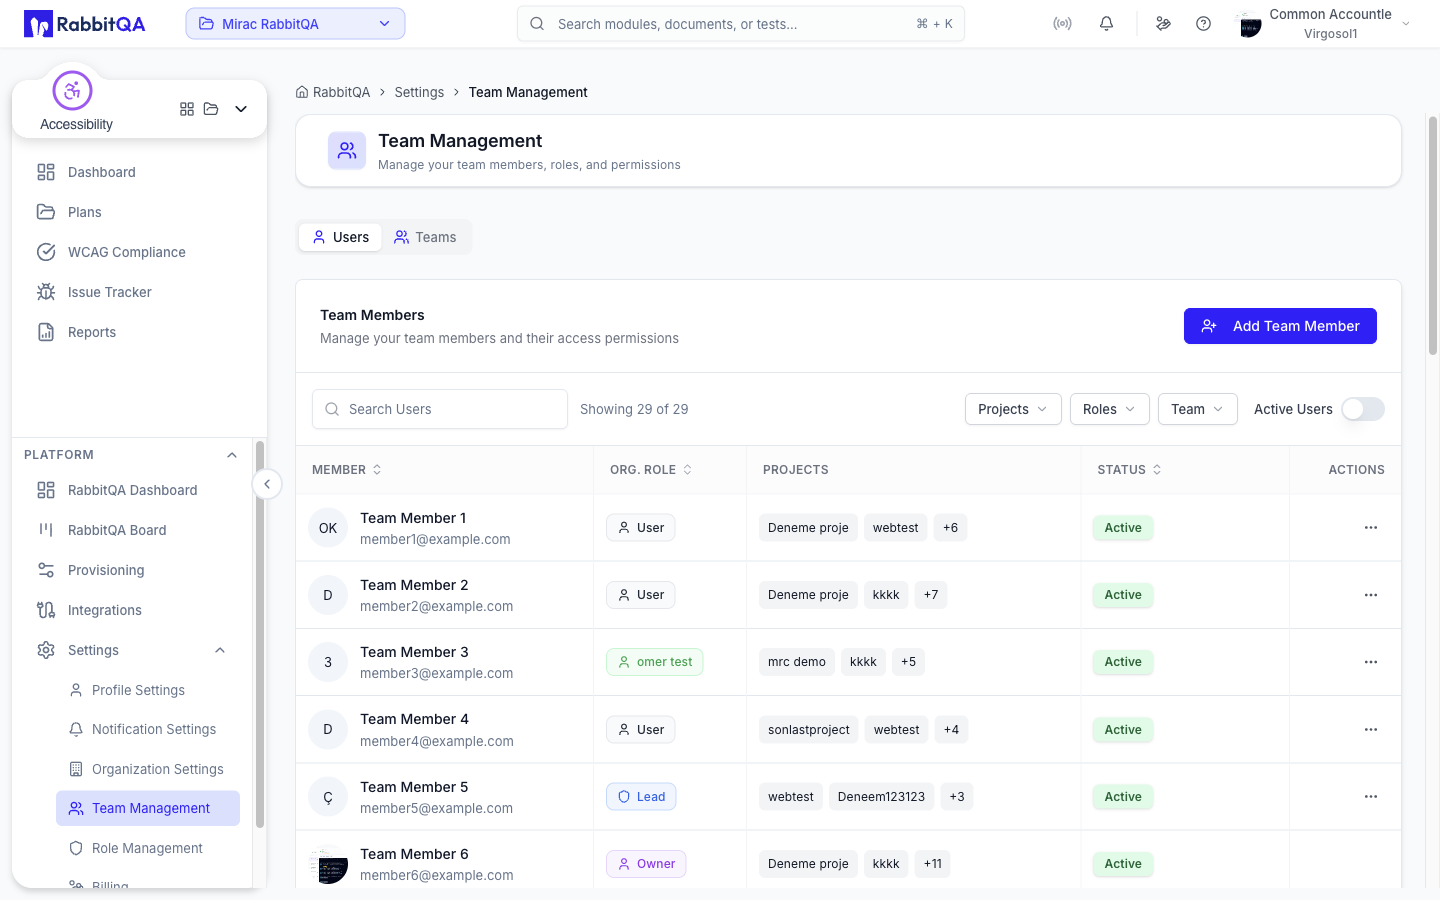
User Management
Viewing Team Members
Navigate to Platform › Settings › Team Management. The page has two tabs, Users and Teams.
The Users tab lists members in a Team Members table:
| Column | Description |
|---|---|
| Member | Avatar, full name and account email |
| Org. Role | The user's organization role, as a badge |
| Projects | The projects (workspaces) the user can reach |
| Status | Active, Inactive or Pending Verification |
| Actions | Row menu, hidden from regular users |
A search box filters by user, a Projects dropdown narrows to one project, and Member, Org. Role and Status are sortable.
Adding Users
- Click Add Team Member
- Enter the Email (the form tells you whether the address already belongs to a user)
- Pick a Role — the list is your company's real roles, standard and custom
- For a new user, fill in Full Name, and optionally Job Title and Phone
- Save
User Status
| Status | Description |
|---|---|
| Active | Verified and able to sign in |
| Pending Verification | Added, but has not yet verified their email and set a password |
| Inactive | Deactivated — cannot sign in, data preserved |
Managing Users
The row menu on a member offers:
| Action | Effect |
|---|---|
| Activate / Deactivate User | Toggles whether the user can sign in. Needs organization:user:update. |
| Change Role | Reassigns the organization role, with a confirmation step. Needs organization:user:update. |
| View Login History | Opens the user's login history |
| Remove from Organization | Deletes the membership, after confirmation. Needs organization:user:delete. |
The Owner cannot be acted on at all. A Lead may only remove regular users, never another Lead or an Admin.
Role Management
Default Roles
The built-in roles, highest first:
| Role | Notes |
|---|---|
| Owner | The organization's founder. Shown as a badge, never assignable, and never actionable from Team Management. |
| Account Admin | |
| Admin | |
| Lead | |
| User | The default role for a new member |
| Viewer | |
| Dealer |
Anything else is a custom role created in Role Management, and is styled as such wherever roles appear.
Creating Custom Roles
- Navigate to Settings › Role Management (needs
organization:role:read) - Click Create Role (needs
organization:role:create) - Enter a role name — it is required before the role can be saved
- Tick the permissions it grants
- Create Role
Default roles cannot be edited or deleted. Their row menu offers View Permissions to inspect them, and Copy to New Role to start a custom role from the same permission set.
Permission Categories
Module Access
Control access to modules:
- TestPilot
- CaseWriter
- DataCrate
- Analyzer
- SmartRequest
- Smart PBI
- AutoRunner
- HealthCheck
- SmartAPI
- MobileHub
- BrowserHub
- Accessibility
Module access is granted per workspace, not per user — see Workspaces. A user reaches a module when their workspace has it enabled and their role carries the matching permission.
Feature Permissions
A permission key is written module:resource:action. The role editor lays them out as a matrix — one row per resource, one column per action:
- View —
read - Create —
create - Update —
update - Delete —
delete - Archive —
archive, only shown when some permission actually uses it
Permissions that are not CRUD get their own labelled row instead of a column — for example autorunner:testdata:reveal, analyzer:pbi:generate and smartrequest:request:approve.
Clicking a column header selects or clears that action for every row shown, and a module filter narrows the matrix to one product at a time.
Platform Permissions
The organization:* keys cover the platform surfaces:
organization:user:*— user managementorganization:role:*— role managementorganization:team:*— teamsorganization:workspace:*— projects (workspaces)organization:billing:readandorganization:billing:request— billingorganization:company:*— organization settings, one key per taborganization:provisioning:*— Provisioning
Integration permissions live under integration:* — integration:tracker:read is labelled "View integrations".
Editing Roles
- Open a custom role's row menu and choose Edit Role & Permissions
- Modify the permission matrix
- Save Changes
Modifying roles affects all users with that role.
Team Organization
Team Structure
A team is a flat group of members that carries project access together. There is no team-lead field — seniority is the member's own organization role.
Each team row expands to its members, showing Member, User Role, Recent activity and Status.
Creating Teams
- Open the Teams tab of Team Management
- Click Create Team (needs
organization:team:create) - Enter a Name — required — and an optional Description
- Save, then add members to the team
A search box filters teams by name and description.
Team Settings
The point of a team is shared project access: open a team's projects drawer and switch on each project (workspace) the whole team may reach. Access then follows team membership as people join and leave.
Access Audit
Login History
Each member's row menu has View Login History, which opens that user's sign-in record.
Best Practices
Role Design
- Keep roles simple and clear
- Use least-privilege principle
- Review roles quarterly
- Document role purposes
User Onboarding
- Create account
- Assign appropriate role
- Add to relevant team
- Send welcome documentation
- Schedule training
User Offboarding
- Deactivate the account immediately
- Review their login history
- Remove them from teams
- Remove them from the organization once nothing depends on the membership
Regular Maintenance
- Monthly: Review inactive users
- Quarterly: Audit role permissions
- Annually: Full access review
