AI Test Case Generation
/casewriter/ai-generator is where a generation session starts.
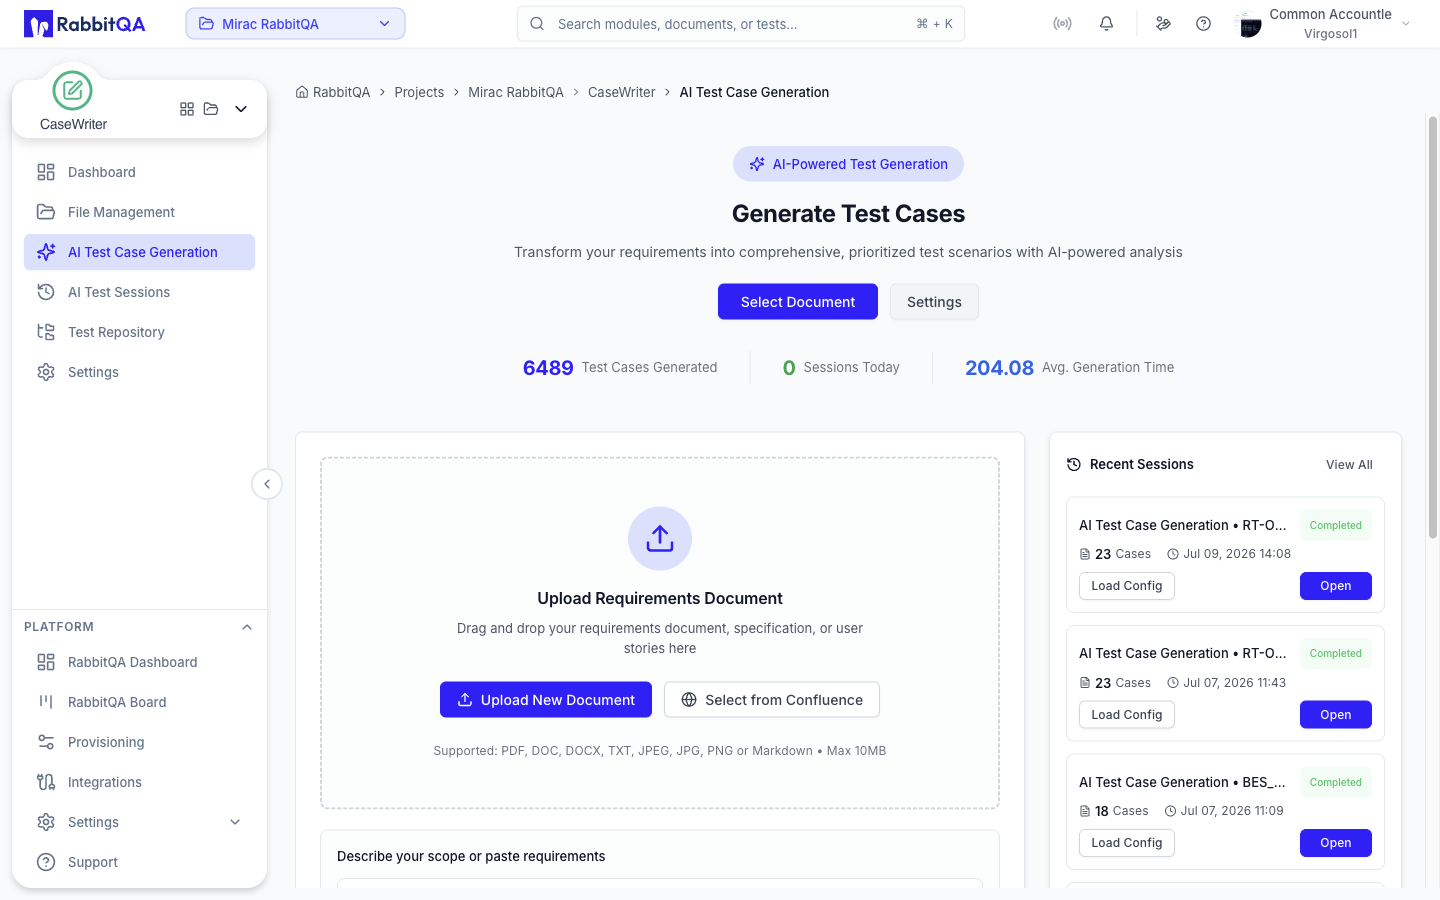 The screen itself lives in the Analyzer package and is mounted by the CaseWriter route.
/casewriter/ai-generator is the only route that serves it — there is no Analyzer URL for the generator.
The Four Stages
| Stage | Where it lives | Required |
|---|---|---|
| Input | The generator's source cards | Yes |
| Configuration | The Advanced Configuration accordion on the same screen | Uses defaults if untouched |
| Mindmap | The AI-Analyze dialog | Optional |
| Results | The analysis view, then the results list | Yes |
The header stepper on the analysis view shows the run itself as File Selection, Analyze, and View Results.
Stage 1: Input
You need at least one valid source.
Documents
Drop a file on the upload area or select Select Document to pick one from the file library, then choose a version. The library is the shared file store described in File Management.
Select from Confluence on the same card opens the Confluence page picker, and the chosen pages are carried on the session as sources.
Requirement Text
Paste requirements into the Describe your scope or paste requirements field. Text is only accepted as a source at 50 characters or more.
Up to 5 images can be pasted or added into this same field, so screenshots travel with the requirement text rather than as a separate source.
Additional Sources
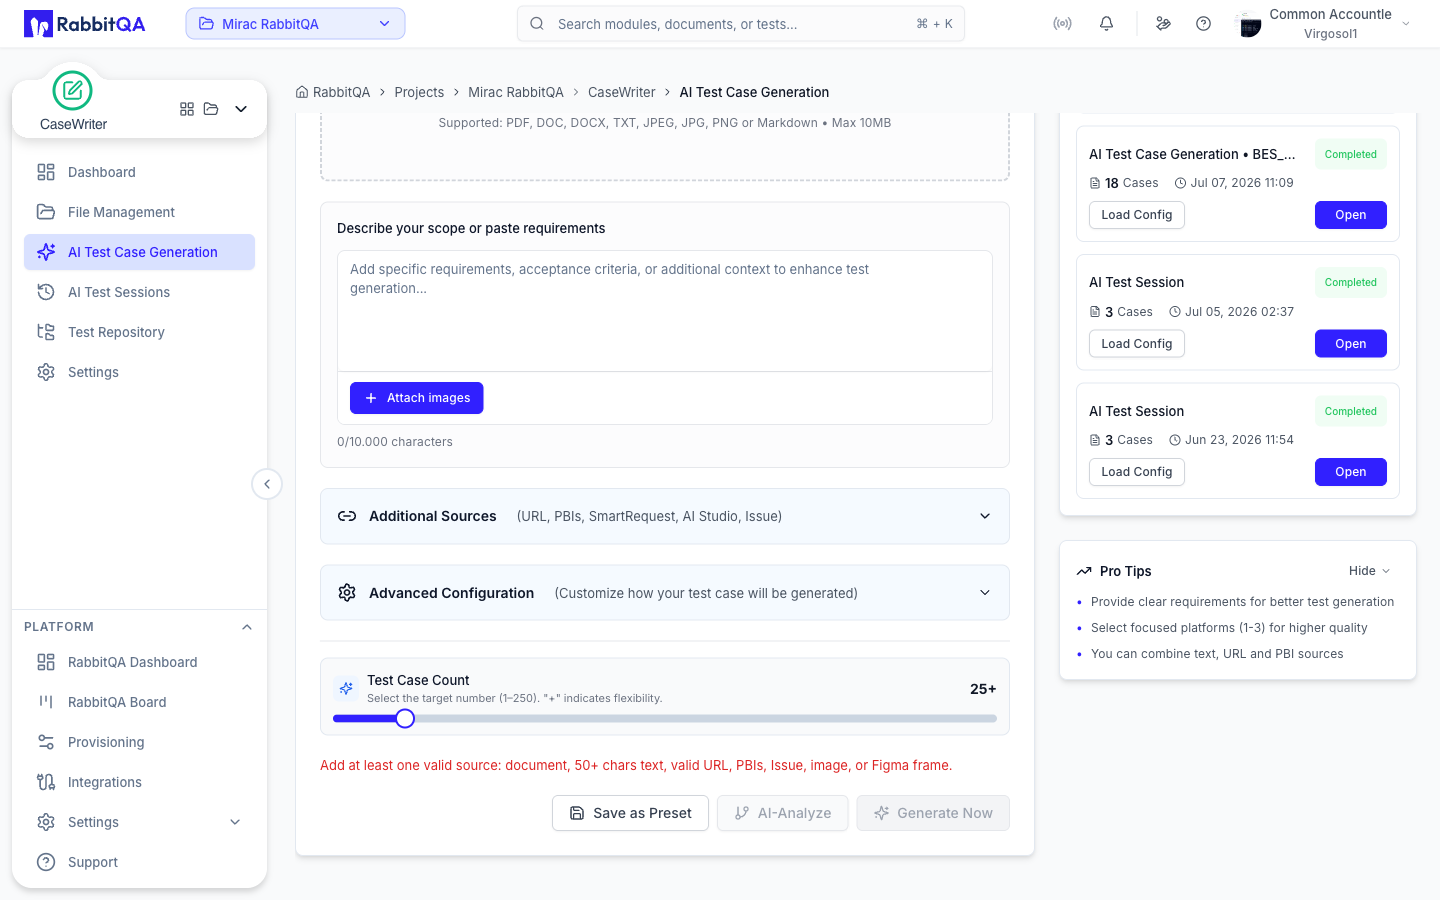
The Additional Sources accordion holds the rest, and shows how many are active. Collapsed, it is labeled (URL, PBIs, SmartRequest, AI Studio, Issue).
| Source | Notes |
|---|---|
| Source URL | Must be a valid http or https address |
| PBIs | Select PBIs from a Smart PBI session |
| SmartRequest | Select a request from SmartRequest |
| AutoRunner AI Studio | Screens sent from AutoRunner AI Studio |
| Issue | A tracker issue, for example from Jira or Azure DevOps |
| Figma Designs | Design frames, when Figma is connected |
URL Preview
With a valid URL entered, Preview Content fetches the page and opens the URL Content Preview dialog.
- Preview renders the extracted text; Edit lets you trim or correct it before generating.
- The dialog reports the character count of the extracted text.
URL preview fetches and extracts only the page you submitted. It does not crawl the site, follow links, or offer candidate pages.
Stage 2: Configuration
Open Advanced Configuration to change how the cases are generated.
| Setting | Notes |
|---|---|
| Output Language | The language the cases are written in |
| Platforms | At least 1 required; 3 or fewer is recommended to keep the run focused |
| Execution Type | For example manual or automated |
| Testing Focus | For example regression, smoke, or sanity |
| Test Level | For example system, integration, or acceptance |
| Test Types | At least 1 required |
| Priority Weights | Must total exactly 100 percent |
| Complexity Weights | Must total exactly 100 percent |
The AI model is no longer chosen per run. It is configured centrally under Integrations — the Settings page links to it with Manage AI Models. Every other default on this list comes from Settings.
Test Case Count
A slider below the accordion sets the target number of cases, from 1 to 250.
When the inputs have been analyzed, the slider shows how many cases the document is estimated to support and offers a one-click Use shortcut for that number.
Presets
- Save as Preset stores the current configuration under a name you choose.
- Selecting a preset applies its values to the form.
- A preset marked as default is applied automatically when you open the generator.
- Presets can be deleted from the picker.
Weights must total 100 percent before a preset can be saved.
Stage 3: Mindmap
AI-Analyze analyzes your inputs and opens a mindmap of the test design before any cases are generated.
The dialog moves through input analysis, feature extraction, structure validation, and mindmap generation, then shows a radial map of features with their test areas.
You can:
- Expand a feature to see its test areas
- Rename features and test areas
- Add or remove features and test areas
- Generate from the edited map
Sessions generated with a mindmap keep it, and the session detail page offers View Mindmap to open and re-run it.
Stage 4: Generation and Results
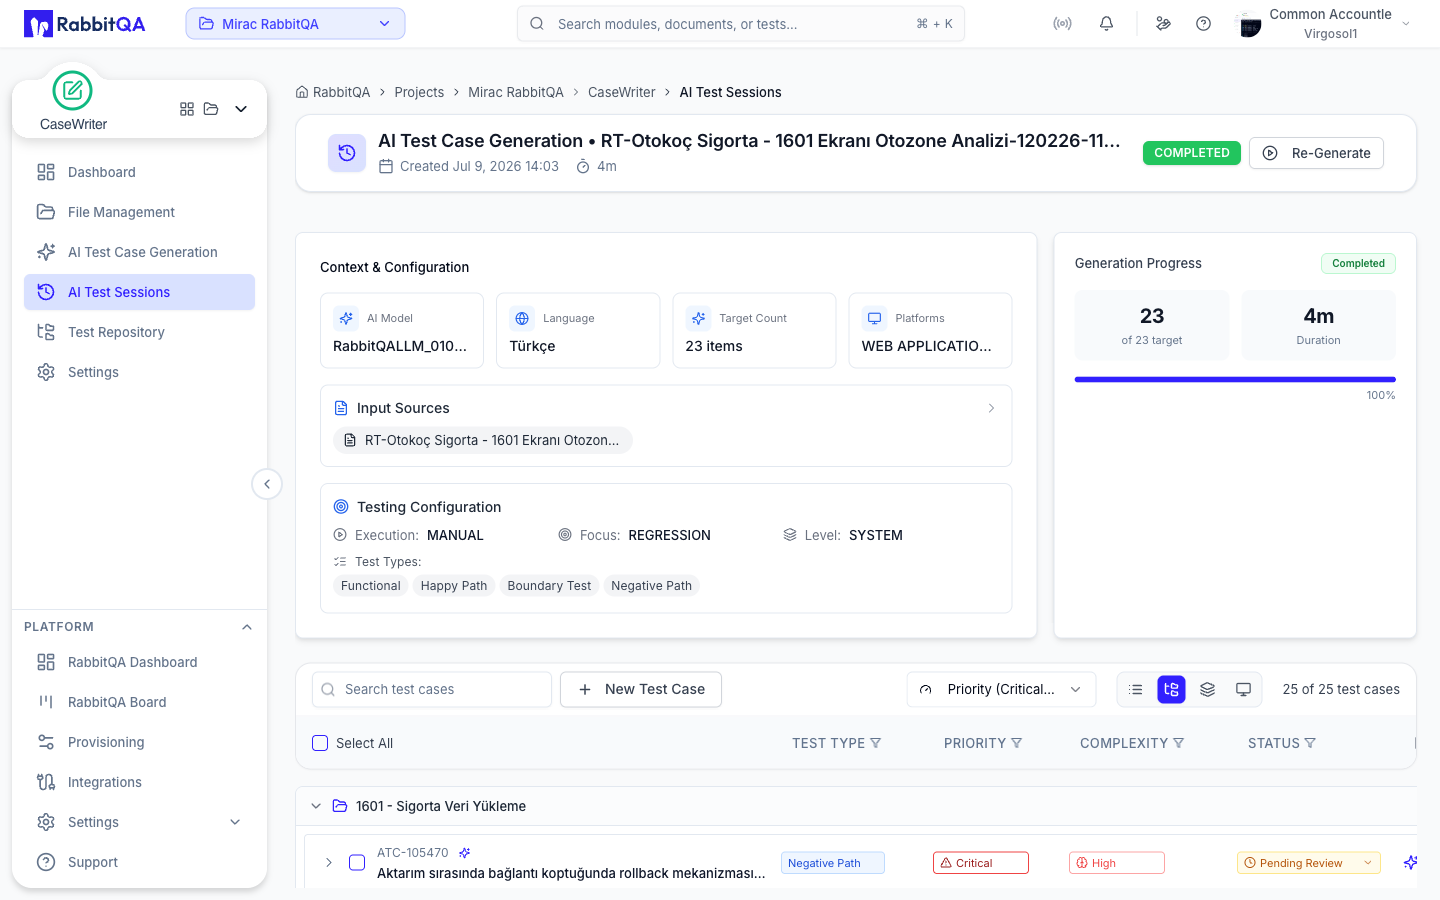
Generate Now starts the session and moves to the analysis view.
Generation consumes AI credits.
Progress
A live banner reports the current phase and the count produced so far, with an estimated time remaining.
| Phase | Shown as |
|---|---|
PROCESSING_INPUTS | Analyzing inputs |
INDEXING_DOCUMENTS | Indexing documents |
GENERATING_TEST_CASES | Creating test cases |
FILLING_DETAILS | Filling in details |
ORDERING | Ordering test cases |
COVERAGE_ANALYSIS | Analyzing coverage |
Stop Generation ends the run early and keeps the cases produced so far.
Working With the Results
The results list carries its own toolbar.
- Search across the generated cases
- Sort by the available fields, ascending or descending
- View as a flat list or grouped by Module, Feature, or Screen
- Columns picker to show or hide Test Type, Priority, Complexity, and Status
- Per-column filters for Test Type, Priority, Complexity, and Status
- Removable filter chips, with a clear action when a filter empties the list
Each row can be expanded to read the description, preconditions, steps, and expected results. A row's overflow menu offers Edit, Duplicate, Copy URL, and Delete; Regenerate is its own icon button beside the menu. The review actions and View history live in the row's Status badge dropdown instead — see Review Workflow. Copy URL produces a link that reopens the session with that case expanded and scrolled into view.
Quality Score
An expanded case shows a Quality Score badge when the model reported one.
- A high score shows as Good.
- A low score shows as Low Quality, with the recorded quality issues in its tooltip.
- The badge is suppressed once a reviewer has approved or rejected the case, so it never contradicts the review status.
Coverage Analysis
When the run produced a coverage report, a Coverage Analysis panel appears above the results with an Overall Score and sections for coverage gaps, uncovered areas, well-covered areas, and recommendations.
The panel is only available after generation completes.
Regeneration
Regeneration asks the AI to rewrite existing cases with extra guidance.
Start it from a single row's Regenerate action, or select several cases and choose Regenerate in the selection bar.
Running a Regeneration
- Write Additional Instructions — this field is required. The dialog suggests examples such as adding edge cases for input validation or making steps more detailed.
- Confirm. The request is queued, then runs; the dialog shows the status line, an elapsed timer, and asks you not to close the window.
- If the job passes a minute, the dialog says it is taking longer than usual and is still working.
- Cancel Regeneration stops the job after a confirmation.
- If the job fails, the dialog stays open with the error. When the failure looks like an exhausted retry or a timeout, it suggests trying again, regenerating fewer scenarios at once, or simplifying the instructions.
Deciding on the Result
When the job finishes, the Compare Regenerated Test Scenarios dialog opens with the original and the AI-regenerated version side by side, with synchronized scrolling.
For each pair, choose one of three outcomes.
| Button | Result |
|---|---|
| Use Regenerated | The regenerated version replaces the original |
| Duplicate | Both versions are kept — the regenerated one becomes a separate case |
| Keep Original | The regenerated version is discarded |
A counter at the bottom summarizes how many are set to replace and how many to duplicate. Apply Changes saves every decision at once; it is enabled only after every pair has been decided. If some choices save and others fail, the dialog reports it and lets you retry the remaining ones.
Regenerated cases and duplicates are set back to Pending Review. They do not inherit the original case's approval.
Saving to the Repository
Select cases and choose Save to Repository.
The button is gated on approval — see Review Workflow for the rules and the partial-save dialog.
The export dialog lets you pick a target test set or create a new one, and can run a duplicate scan before saving.
Excel Export
Export Excel in the selection bar downloads the selected cases as an .xlsx file.
The whole session can also be exported.
See Import and Export.
Starting Over
Start Over clears the current session and returns to the input step, after a confirmation. Going back from the analysis step stops the run in progress.
Related
- AI Test Sessions — reopen and manage past runs
- Review Workflow — the approval gate
- Settings — generation defaults
